Introduction: Why Upgrade Your HVAC Thermostat in Boston?
Boston’s climate is famously unpredictable—a warm spring day can give way to a brisk cold snap overnight, and winters are legendary for their chill. In this environment, having precise control over your home’s heating and cooling isn’t a luxury—it’s a necessity. Yet, many Boston homeowners and businesses still rely on outdated, manual thermostats that can’t keep up with modern comfort needs or energy-saving expectations. Upgrading to a smart or programmable thermostat is one of the most cost-effective HVAC improvements you can make. Not only does it offer greater comfort and convenience, but it can also help you rein in those steep New England energy bills. This step-by-step guide is tailored for Boston properties, addressing unique local considerations like oil heat compatibility, zoning quirks in historic homes, and maximizing the benefits of rebate programs. Whether you’re a DIY enthusiast or planning to work with a contractor, you’ll find practical advice, troubleshooting tips, and expert insights to ensure your thermostat upgrade goes smoothly and delivers real results.
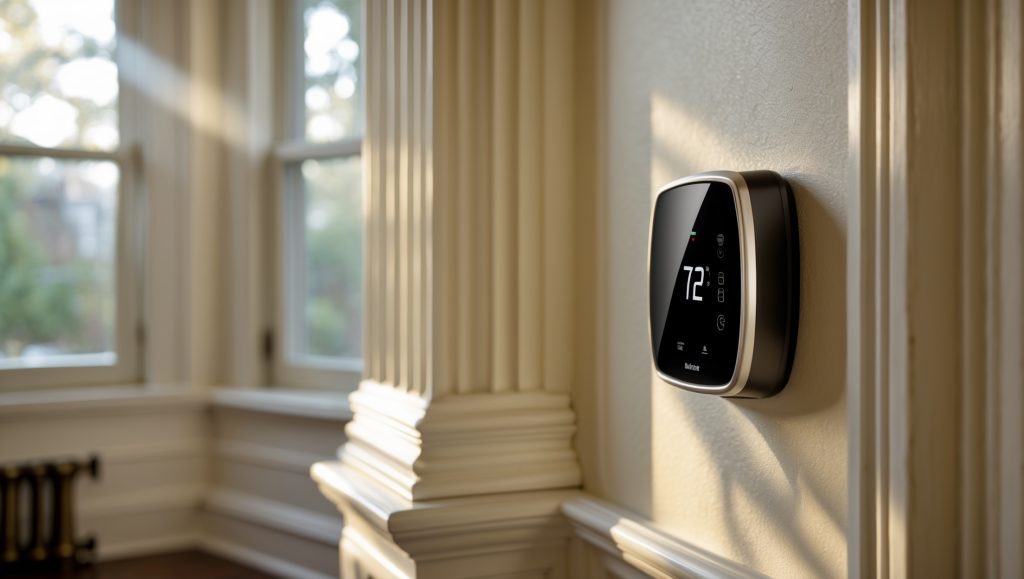
Understanding Thermostat Types and Compatibility
Manual, Programmable, and Smart Thermostats: What’s the Difference?
Before diving into installation, it’s essential to pick the right thermostat for your setup. Here’s what you need to know:
- Manual Thermostats: Basic models that require hand adjustments. Offer little in the way of scheduling or energy savings.
- Programmable Thermostats: Allow you to set schedules for heating and cooling, offering significant energy savings for Boston’s fluctuating seasons.
- Smart Thermostats: Connect to Wi-Fi, learn your habits, and can be controlled via apps. Many models qualify for Mass Save rebates and integrate with smart home systems.
Boston’s Unique HVAC Considerations
- Heating Fuel Types: Many Boston homes use oil or steam heat; not all thermostats are compatible with these systems. Always check manufacturer compatibility charts.
- Multi-Zone Systems: Brownstones and larger properties may have multiple heating/cooling zones. Some smart thermostats support multi-zone control or require additional sensors.
- Wiring: Older homes may lack a common “C” wire needed for smart thermostats. Solutions include power extenders or professional installation.
Step 1: Assess Your Existing Thermostat and HVAC System
Turn Off Power and Inspect Wiring
Always begin by switching off HVAC power at your breaker panel to avoid electrical hazards. Remove your current thermostat’s cover and examine the wiring:
- Take a clear photo of the wire connections—this is invaluable during installation.
- Label each wire with provided stickers or masking tape (e.g., R, W, Y, G, C).
- Note any missing wires, especially the “C” (common) wire, which supplies power to many smart thermostats.
Check Compatibility
Match your existing wires and HVAC system type (forced air, boiler, heat pump, etc.) with the compatibility guidelines for your chosen thermostat. Most manufacturers offer online compatibility checkers.
Step 2: Choose the Best Thermostat for Your Boston Home
Feature Priorities for Local Climate
- Adaptive Scheduling: Look for models with auto-schedule or learning features, perfect for unpredictable Boston weather.
- Remote App Control: Ideal for Boston residents who travel or have second homes on the Cape.
- Energy Reports: Some smart thermostats generate monthly reports to help you monitor and reduce usage.
- Integration: If you use Alexa, Google Home, or Apple HomeKit, check for compatibility.
- Local Rebates: Mass Save offers rebates up to $100+ for qualifying smart thermostats; check their website for current deals.
Recommended Models for Boston
- Ecobee Smart Thermostat Premium: Works well with oil, gas, and electric systems; supports remote sensors for drafty homes.
- Nest Learning Thermostat (3rd Gen): Popular in historic homes for its retro-modern look; easy to use and energy efficient.
- Honeywell Home T9: Good for multi-zone homes; flexible scheduling and robust app features.
Step 3: Gather Tools and Materials
Most thermostat upgrades require only basic tools:
- Small flathead and Phillips screwdrivers
- Drill with small bits (for new mounting holes)
- Level (to ensure straight installation)
- Wire labels or masking tape
- Smartphone or camera (for wire documentation)
- Wall anchors (for plaster or masonry walls common in Boston homes)
- Voltage tester (recommended, especially in older homes)
Step 4: Remove the Old Thermostat
Careful Disassembly
After ensuring power is off, gently remove the old thermostat’s faceplate. Unscrew the base from the wall, keeping wires accessible. If wires are short, use a pencil or pen to prevent them from slipping into the wall cavity.
Wall Preparation
- Patch any large holes with spackle and allow to dry.
- Remove dust or debris for a clean mounting surface.
- Use the included trim plate if the new thermostat is smaller than the old one’s footprint.
Step 5: Install the New Thermostat
Mounting the Base
Hold the new thermostat base against the wall and use a level to ensure it’s straight. Mark screw holes, drill pilot holes if needed, and use anchors for old plaster or brick. Secure the base tightly but avoid cracking delicate walls.
Connecting the Wires
- Match each labeled wire to the correct terminal (R, W, Y, G, C, etc.).
- Insert the wires firmly—loose connections can cause malfunctions.
- If you lack a C wire, check the thermostat’s instructions for alternatives (power extenders or adapters may be included).
- Double-check all connections against the photo taken earlier.
Attaching the Display
Gently snap the thermostat’s display onto the base. Restore power at the breaker. The thermostat should power on and begin setup; if not, recheck power and wire connections.
Step 6: Configure and Program Your Thermostat
Initial Setup
Follow on-screen prompts to select your language, connect to Wi-Fi, and enter your heating/cooling system details. Many models will run an initial system test—let it complete before proceeding.
Programming for Boston’s Climate
- Heating Schedules: In winter, set the heat to lower when you’re asleep or away (try 62–65°F overnight; 68–70°F when home).
- Cooling Schedules: For summer, raise the AC setpoint when the house is empty (78–80°F), and cool to comfort (72–74°F) when occupied.
- Weekend Variations: Boston’s social calendar can be busy; customize schedules for weekends versus weekdays.
- Vacation Mode: Use this feature to minimize energy use while you’re away—critical for winter trips to avoid frozen pipes.
Enabling Smart Features
- Activate geofencing, if supported, to automatically adjust settings based on your phone’s location.
- Integrate with your smart home system (Alexa, Google Assistant, Apple HomeKit) for voice control and automation.
- Sign up for monthly or seasonal energy reports, if available.
Step 7: Troubleshooting Common Installation Issues
Thermostat Won’t Power On
- Double-check that the circuit breaker is on.
- Ensure the C wire is connected if required.
- Some systems require the HVAC door switch to be closed; verify it’s properly latched.
System Doesn’t Heat or Cool Properly
- Confirm wires are in the correct terminals—miswiring is the most common issue.
- Check that system type (forced air, heat pump, boiler) is correctly set in the thermostat menu.
- Older homes may have unique wiring; consult the manual or seek professional help if in doubt.
Wi-Fi Connection Problems
- Make sure your Wi-Fi password is correct and the signal is strong at the thermostat’s location.
- Reboot your router and thermostat if you experience connectivity drops.
Step 8: Optimizing Comfort and Efficiency Post-Installation
Fine-Tuning Your Settings
- Monitor your comfort after a week and adjust schedules as needed.
- Take advantage of learning features—let the thermostat adapt to your patterns.
- Use remote sensors in drafty or unevenly heated/cooled areas to balance comfort.
- Review energy reports monthly to spot trends and optimize further.
Maintenance Tips
- Dust the thermostat regularly to prevent sensor errors.
- Update firmware via the app to benefit from new features and security patches.
- Replace batteries annually if your model uses them (some smart thermostats have battery backup).
Local Resources for Boston Homeowners
Rebate and Incentive Programs
- Mass Save: Offers rebates and 0% financing for qualifying thermostats. Visit masssave.com for details.
- City of Boston: Check local energy efficiency initiatives and weatherization programs.
When to Call a Professional
- If you lack a C wire and aren’t comfortable adding one.
- Complex multi-zone systems or integration with boilers/steam heat.
- Historic homes with delicate wiring or preservation concerns.
Boston has many licensed HVAC contractors experienced with smart thermostat installations and familiar with local building codes. Don’t hesitate to get a quote if you’re unsure.
Conclusion: Enjoy Greater Comfort and Savings All Year in Boston
Upgrading your HVAC thermostat is a smart move for any Boston homeowner or business aiming for better comfort, lower energy bills, and improved control over indoor environments. While the installation process is straightforward for most, Boston’s unique mix of historic homes, varied heating systems, and challenging climate means it pays to plan carefully and choose equipment that truly fits your needs. By following the detailed steps outlined above—assessing compatibility, selecting the right features, preparing your space, and programming your new thermostat for local weather—you’ll set yourself up for success. Don’t forget to take advantage of local rebates and call in a professional if you encounter complex wiring or multi-zone challenges. Once installed, your new thermostat will quickly begin to pay off in both comfort and savings, adapting to Boston’s seasons and your lifestyle. Whether you’re warming up a Beacon Hill brownstone or keeping a Back Bay office perfectly temperate, upgrading your thermostat is one of the smartest, most accessible HVAC improvements you can make. Stay cozy, save money, and enjoy smarter control—Boston style.
If I replace my current manual thermostat myself, what are the key troubleshooting steps I should take if the new unit doesn’t control my HVAC system correctly right after setup?
If your new thermostat isn’t controlling your HVAC system after installation, first double-check that all wires are connected to the correct terminals based on the instructions. Make sure the power to the HVAC system is turned back on and that the thermostat itself is properly mounted. Also, confirm that the settings on the thermostat match your system type (heating, cooling, or both). If the system still doesn’t respond, check for blown fuses or tripped breakers and review the manufacturer’s troubleshooting guide for specific error codes or signals.
The article mentions Mass Save rebates for certain smart thermostats. Could you clarify which features or brands usually qualify for these rebates, and whether the process for applying is straightforward for homeowners doing a DIY install?
Mass Save rebates typically apply to ENERGY STAR certified smart thermostats from major brands like ecobee, Google Nest, and Honeywell. Features needed usually include Wi-Fi connectivity and remote control capability. Homeowners can apply for the rebate even if they install the thermostat themselves—just keep your purchase receipt and follow the online application steps. You may need to provide photos of your installation and model details, but the process is designed to be user-friendly.
What’s the average installation time for a DIY thermostat upgrade in a Boston area home, especially if our house is historic and may have weird zoning? I only have a few hours on weekends to tackle things like this.
For most Boston homes, a DIY thermostat upgrade usually takes about 1 to 2 hours if your wiring is straightforward. In a historic home with unusual zoning or older wiring, you might need 2 to 4 hours to sort things out, especially if you have to trace wires or update connections. Be sure to turn off the power first, take photos of your current setup, and keep the instructions handy.
If I’m planning to do the installation myself on a weekend, how long does the process typically take for someone with basic DIY skills? I just want to make sure I’m not biting off more than I can handle in one afternoon.
For someone with basic DIY skills, installing a new HVAC thermostat usually takes 1 to 2 hours. This includes shutting off power, removing the old thermostat, wiring the new one, and testing the system. If your wiring is straightforward and you have the necessary tools, you should be able to finish comfortably in one afternoon.
The guide mentioned troubleshooting tips for installation. If an updated thermostat doesn’t seem to control the heating or cooling as expected right after setup, what are the most common causes in Boston-area homes with oil heat?
If your new thermostat isn’t controlling the heat properly in a Boston-area home with oil heat, common causes include incorrect wiring (especially the R and W terminals), not setting the thermostat to match your heating system type (oil furnace or boiler), or not enabling the correct fan or heat modes. Double-check the wiring connections, make sure the system settings in the thermostat match your equipment, and confirm that the power switch to the furnace or boiler is on.
For those planning to hire a contractor instead of DIY, what questions should Boston homeowners ask to ensure the thermostat installation will maximize energy savings and comfort, especially given the local climate challenges?
When speaking with a contractor, ask which thermostat models are best for Boston’s climate and if they offer smart features like adaptive scheduling or remote access. Check if they’ll program energy-saving settings tailored to your home’s insulation and heating/cooling patterns. Confirm their experience with local energy codes and rebates, and ask if they provide a walkthrough of the new system so you get the most comfort and savings possible.
When it comes to taking advantage of Mass Save rebates for smart thermostats, what are the steps involved? Is it better to work with a contractor for the paperwork, or can a small business owner handle it solo?
To get Mass Save rebates for smart thermostats, you’ll typically need to purchase a qualifying device, have it installed, and submit an application with proof of purchase and installation. Many small business owners handle the paperwork themselves, but working with a contractor can make the process easier, especially if they’re familiar with Mass Save requirements. Contractors often help with documentation and ensure the thermostat meets program criteria, saving you time and reducing errors.
The guide talks about compatibility with oil heat systems, which my place uses. How do I find out if a specific smart thermostat will actually work with oil or steam heat before I buy one?
To check if a smart thermostat is compatible with your oil or steam heat system, first look at the product’s compatibility list—manufacturers usually mention supported heating types on the box or their website. You can also check if the thermostat supports two-wire (often used for oil and steam systems). If you’re unsure, take a photo of your current thermostat wiring and ask the manufacturer’s support team or your HVAC technician for confirmation.
I run a small business in a historic Boston building, and we use oil heat with a pretty old HVAC system. Are there specific smart thermostats that work reliably with oil or steam heat setups, or do I need to look for features beyond basic compatibility?
For oil or steam heat systems, especially in older Boston buildings, look for smart thermostats that clearly support two-wire or single-stage heating systems. Models like the Honeywell Home T9 or ecobee SmartThermostat are often compatible, but always double-check product specs for oil or boiler heat support. You may also need a C-wire adapter if your wiring is older. Features like remote sensors and smart scheduling can help further, but compatibility is your top priority.
My house has an older oil heat system. Could you clarify how to check if a smart thermostat will be compatible before I buy one? Are there brands that are better for Boston homes with oil heat?
To check if a smart thermostat will work with your older oil heat system, look at your current thermostat’s wiring—most smart thermostats need a C-wire for power. Check your furnace and wiring or consult your system’s manual. When choosing a brand, ecobee and Honeywell models are often praised for compatibility with oil heat and Boston climates, but always double-check their compatibility lists or ask your HVAC technician to be sure.
For homeowners on a budget, do you have suggestions for the most cost-effective programmable thermostats that still qualify for Mass Save rebates? I’m interested in balancing upfront costs with long-term savings.
If you’re looking for a budget-friendly programmable thermostat that qualifies for Mass Save rebates, consider models like the Honeywell Home T5 or Emerson Sensi. Both are affordable, meet rebate requirements, and offer scheduling features to help you save on energy bills. Make sure to double-check the current Mass Save list, as rebate-eligible models can change over time.
If I run into problems with the wiring during the installation, especially in an older house with oil heat, are there common troubleshooting steps a beginner like me should try before calling in a professional?
If you encounter wiring problems, first turn off the power to your HVAC system for safety. Double-check that your new thermostat’s wiring labels match those from your old thermostat; take photos before disconnecting anything. Look for any loose or corroded wires and trim and re-strip them if needed. Make sure each wire is securely attached to the correct terminal. If you still have issues, especially with older oil heat systems, it may be time to consult a professional.
For older Boston homes with steam heat, how can I be sure a smart thermostat will work with my current system, or are there specific models I should be looking for?
For older Boston homes with steam heat, it’s important to check if your system uses two wires or has a common (C) wire, as many smart thermostats require a C wire for power. Look for smart thermostats that specifically list compatibility with steam or boiler heating systems. Models like the Nest E or ecobee often work, but double-check your wiring or consult an HVAC professional before purchasing.
I live in a historic home with multiple heating zones and quirky wiring setups. Can you recommend any specific thermostat brands or models that are known to handle complex zoning situations in older Boston houses?
For historic homes with multiple zones and unique wiring, you might want to look at thermostats like the Honeywell T6 Pro Series, Ecobee SmartThermostat with remote sensors, or the Emerson Sensi Touch. These models are known for their compatibility with a range of older and complex HVAC setups, and many can accommodate multi-zone systems when paired with zoning panels. It’s always a good idea to consult a local HVAC professional to confirm compatibility with your specific wiring and zoning needs.
If I want to upgrade my thermostat myself, what are some common mistakes people make during installation, especially when dealing with older Boston homes that might have unconventional wiring?
When upgrading thermostats in older Boston homes, a common mistake is not labeling the existing wires before disconnecting them, which can make reconnection confusing. Some older systems may lack a common (C) wire needed for modern thermostats. Also, people sometimes mismatch wire connections, assuming colors always match functions. It’s important to turn off power at the breaker before starting and double-check compatibility between your new thermostat and your HVAC system. If you’re ever unsure, consulting a professional can prevent costly errors.
You mentioned Mass Save rebates for smart thermostats—do you know if small commercial properties qualify, or are those rebates just for residential upgrades?
Mass Save rebates for smart thermostats are primarily targeted at residential customers, but certain small commercial properties may also qualify depending on their energy provider and specific program details. It’s a good idea to contact Mass Save directly or check with your utility company to confirm eligibility for your property type before making a purchase.
You mentioned troubleshooting tips in the article—could you clarify what common problems someone in Boston might face during a thermostat upgrade, especially with legacy HVAC equipment?
Certainly! In Boston homes with older HVAC systems, common issues during a thermostat upgrade often include mismatched wiring (older wires may lack a C-wire or use different color codes), compatibility problems with newer smart thermostats, and difficulties with mounting the new device on aging wall plates. You might also face power issues if the system can’t supply enough voltage. Double-check wiring diagrams and consider a professional if you’re unsure.
I saw the mention of Mass Save rebates for smart thermostats. Are there certain brands or models that qualify more often, and how would someone in Boston go about claiming these rebates during the upgrade process?
Mass Save typically requires smart thermostats to be ENERGY STAR certified to qualify for rebates. Brands like Nest, ecobee, and Honeywell often have eligible models. To claim the rebate in Boston, purchase a qualifying thermostat, then submit your receipt and installation details through the Mass Save website or mail-in form. Always check Mass Save’s current list of approved models before buying to ensure eligibility.
My house was built in the early 1900s and has a mix of old zoning setups. Are there any complications I should expect if I try to upgrade to a programmable thermostat on my own?
Upgrading a thermostat in an older home with mixed or legacy zoning can be tricky. You might encounter wiring that doesn’t match modern thermostats, or incompatible voltage if your system uses line-voltage controls instead of low-voltage. Some zoning systems need specialized thermostats. It’s a good idea to turn off power before starting, label wires carefully, and consult your HVAC system’s manual. If you’re unsure about the wiring or compatibility, consider consulting a professional to avoid damaging your system.
Let’s say I want to do the thermostat upgrade myself and I’m new to this kind of project. What’s the best way to troubleshoot if the new thermostat doesn’t seem to control the heat or AC properly after installation?
If the new thermostat isn’t controlling your heat or AC after installation, first double-check that all wires are connected to the right terminals, and that they’re firmly secured. Make sure the power to your HVAC system is switched on. Then, confirm that you’ve set the thermostat to the correct mode (heat or cool) and temperature. If it’s still not working, check the system’s circuit breaker and the batteries in the thermostat, if it uses them. If problems persist, consulting the thermostat manual or reaching out to the manufacturer’s support can be helpful.
If I install a new thermostat myself and it doesn’t seem to control the heating zones properly, what’s the first thing I should check? Could this be due to old wiring, or is it more likely a compatibility issue?
If your new thermostat isn’t controlling your heating zones correctly, first double-check that each wire is connected to the correct terminal on both the thermostat and the zone control panel. Compatibility issues are common, especially in homes with multi-zone systems, so review the thermostat’s specs to ensure it supports your setup. Old or mislabeled wiring can also cause problems, so labeling wires during removal and confirming connections can help troubleshoot.
If I try upgrading the thermostat myself and run into trouble with older wiring or a non-standard system, are there any troubleshooting tips or must-know steps in the guide for Boston properties with unusual HVAC setups?
If you encounter older wiring or a non-standard HVAC setup, it’s important to first turn off power to the system before working. Take clear photos of the existing wiring for reference. Boston homes often have legacy systems, so label each wire as you disconnect it. If wiring colors don’t match the new thermostat’s instructions, check for a wiring diagram on your old unit or in the guide. When in doubt, it’s safest to consult a licensed HVAC technician familiar with Boston-area systems.
If my Boston house is split into multiple HVAC zones, do I need a separate smart thermostat for each zone, or are there systems that allow centralized control? Also, how complicated is the installation for historic homes with older wiring?
For homes with multiple HVAC zones, you usually need a separate smart thermostat for each zone to control them individually. However, some brands offer centralized systems or apps that let you manage all zones from one interface. In historic homes with older wiring, installation can be tricky, especially if you lack a common wire (C-wire). You might need an adapter or professional help to ensure compatibility and proper functioning.
For small businesses like mine operating in older Boston buildings, what should I look out for when it comes to zoning quirks or older wiring before buying a programmable thermostat?
For older Boston buildings, check if your HVAC system has multiple zones and confirm whether each zone has its own thermostat wiring—this affects compatibility with programmable thermostats. Also, inspect the existing wiring; older setups may lack a C-wire, which many new thermostats require. You might need an adapter or professional help if wiring is outdated. Always verify your system type (like forced air, steam, or radiant heat) to ensure the new thermostat will work correctly.
With Boston’s fluctuating temperatures, about how long does it take for homeowners to see noticeable savings on their energy bills after upgrading to a programmable or smart thermostat?
Most homeowners in Boston start noticing energy savings within one to two billing cycles after installing a programmable or smart thermostat. Savings typically become apparent in about 1 to 3 months, depending on how well you use scheduling and temperature settings. The more you take advantage of features like automatic adjustments and remote control, the quicker you’ll see a reduction in your energy bills.
I noticed the article mentions Mass Save rebates for smart thermostats. Are there any specific models you recommend that qualify for these rebates, and is the application process straightforward for DIY installers?
Mass Save typically approves popular smart thermostats like the Google Nest, Ecobee, and Honeywell Home models for rebates, provided they’re ENERGY STAR certified. The application process is straightforward and can be completed online—after installation, you’ll need to submit proof of purchase and installation details. DIY installations are accepted as long as the thermostat is eligible and installed in a residential property.
Is the thermostat swap something a beginner DIY-er could realistically do in a Boston apartment, or are there common installation surprises (like wiring differences for oil heat) that mean it’s safer to call a contractor?
Swapping a thermostat can be a DIY project if you’re comfortable turning off circuit breakers and following wiring diagrams. However, Boston apartments often have unique setups, especially with oil heat systems, which might use different or older wiring. If your existing wires or labels don’t match the new thermostat instructions, or if you’re unsure about compatibility, it’s safer to consult a contractor to avoid damaging your HVAC system or voiding warranties.
If something goes wrong during installation—like if the new thermostat doesn’t power on—what are some troubleshooting steps I can try before calling a professional? Any tips for avoiding common mistakes with older oil heat systems?
If your new thermostat doesn’t power on, first double-check that the circuit breaker for the HVAC system is on, and confirm the wiring matches both the old thermostat and the new unit’s instructions. Make sure the thermostat’s base is securely connected, and that batteries (if used) are fresh. For older oil heat systems, use caution with the C-wire; many older setups don’t have one. Always turn off power at the breaker before any wiring work and label wires as you disconnect the old thermostat to avoid mix-ups.
As a business owner, I’m always watching costs. Can you give more detail about the expected payback period when upgrading to a smart thermostat, especially with Mass Save rebates factored in?
With Mass Save rebates, the upfront cost of a smart thermostat can drop significantly—often to around $50–$100 out of pocket. Most Boston business owners see energy savings of 8–15% per year, which typically means the payback period is about 1–2 years. Actual results depend on your building’s usage patterns, but the investment often pays for itself quickly thanks to both savings and rebates.
I live in a pretty old apartment in Boston and our building uses oil heat. How can I tell for sure if a smart thermostat will work with my setup, and are there specific models you’d recommend for oil systems?
To determine if a smart thermostat will work with your oil heat system, first check if your current thermostat uses standard low-voltage (24V) wiring, which is common in many older Boston apartments. Remove the old thermostat cover and look for labeled wires (like R, W, C). Most smart thermostats, such as the Nest or ecobee, are compatible with oil heat if you have these wires. If you’re unsure, sharing a photo of the wiring with a professional can help confirm compatibility.